Cardboard taxidermy has been quite the rage and it's rather easy to do yourself, so why not give it a go?
This tutorial is based on a great 'how to' by J3443RY on Instructables, that we loved, but we missed an extra something; a season-appropriate update. The classic mounted head has a certain wintery feel to it, even if it's the fake cardboard version . This is where the wrapping paper comes in. Besides being plain cute and summery, it also allows you to use lower quality materials, e.g. the slightly filthy box your Ikea couch came in, and it doesn't require the same level of handiness a wooden version does. I'll cover the first few steps a bit quick, as they are explained quite well on Instructables.
You'll be needing:
--a printer to print out the pattern as provided here:J3443RY on Instructables
-a pair of scissors
-tape
-cardboard, whatever's available (I used 5 mm)
-a filt tip marker or a pencil
-a stanley knife
-glue (both UHU PUR as well as ordinary all-purpose glue)
-gift wrapping paper or any other firm paper
consider these questions;
< Do I want the effect of a small repeated pattern or a larger, more collage-like design?
< Where do I want which pattern? Do I leave the mount without pattern etc
< Base the amount of gift wrapping paper on the area (scale, what do I leave without pattern)
-insulation board
-some patience or a helping hand to speed up the job

Let's get started!
First print out the stencil as provided by J3443RY on Instructables/ (use a program like photoshop to scale it if you want a smaller version). Then cut out the paper forms and tape them together as shown in the tutorial. Draw the lines on the cardboard, preferably using a pencil. The interlocking cuts should have the same width as the cardboard.
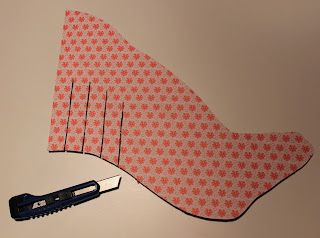
Use a stanley knife to cut out the main shapes. Just ignore the interlocking cuts for now, as it'll be less work to cut them after the wrapping paper has been applied.
Next up is the wrapping paper; think about reusing your christmas presents' wrapping paper or search for any other sort of firm paper. We decided to pick up some matching designs at 'Huiszwaluw'. (You can find them online at http://www.huiszwaluw.com/it's 1.50 euro a piece ).
This is a good time to consider the design; would you like to see the deer's head in one pattern, and the antlers and the mount in another or everything decorated in the same way? And will I be decorating both sides of every piece?
I'd recommend only decorating the 'visible from a reasonable distance'-sides, not only is it more economical, it also gets the job done quicker.
We chose to 'randomly' apply the pattern to the mounted head to give it a quirky look.
 Glue the preferred wrapping paper onto the cardboard using all-purpose glue, then cut around the edges of the cardboard form to remove excess paper.
Now cut out the interlocking cuts very meticulously as a too narrow or too large opening swill make the whole construction crooked (no pressure).Repeat the previous step on the other side if necessary (a.k.a visible) and cut out the interlocking cuts again. It's important to do this gently, as the paper might rip.
By now you should be left with a pile of these colourful pieces, so its time to start the final step; the construction.
First put together the mount by simply putting a piece of insulation board between the two cardboard form.
Be sure to use insulation- friendly glue, otherwise the glue might eat away the insulation. (Don't ever,ever use super glue on insulation). I'd recommend UHU PUR.
Then start constructing the actual head (more information ;J3443RY on Instructables).
Here's some images of the construction:
Now the pieces of the puzzle are put together: the deer head needs to be glued onto the mount.This turned out to be not as simple as anticipated as the cardboard head is relatively heavy.
 I found that by simply adding two blocks of insulation, cut to fit between the ribs at the back of the head, the problem could be solved. This way the contact surface between mount and head is enlarged.
Glue everything together.
(Yet again it's best to use insulation-friendly glue to glue the deer's head onto the mount.)
Et voilà; your very own animal-friendly hunting trophy!
Some ideas for other variations: if you're skilled with woodworking, I'd definately recommend trying this one in wood. If you are however not quite so talented, there's this cardboard version, but there's also kadapak (It's essentially insulain in between cardboard). Kadapak is way more expensive than cardboard but it does come in a variaty of finishes; matte, shiny and colours; grey, black and white and is even easier to work with.


No comments:
Post a Comment